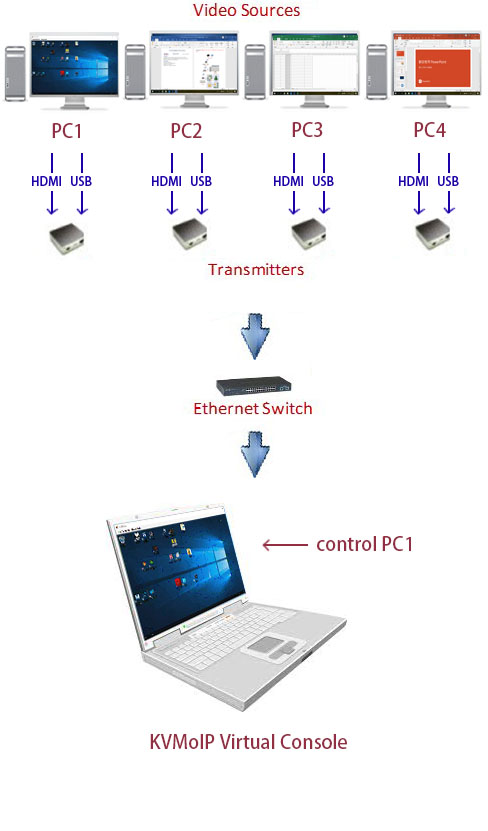
AV-952x KVMoIP Virtual Console
The AV-952x KVMoIP Virtual Console is a Windows based software program to run on PC to work as a Virtual Receiver to KVM control the TX PC.
System Diagram

AV-952x KVMoIP Virtual Console Setup
1. Connect 4 x PC HDMI to 4 x AV-9520T HDMI input (TX-1, TX-2, TX-3 and TX-4).
2. Set the Multicast IP for TXs. For example, set TX-1 to 225.0.100.001, TX-2 to 225.0.100.002, TX-3 to 225.0.100.003, and TX-4 to 225.0.100.004.
3. Connect all TXs to Gigabit Ethernet Switch by CAT6 cable.
4. There are 4 TXs, make sure the Gigabit Ethernet Switch IGMP snooping is enabled.
5. Connect the controller PC to the same Ethernet Switch by CAT5e or CAT6 cable.
6. Power On all monitors, PCs, Ethernet Switch and all TX units.
7. Copy the AV-952x KVMoIP Virtual Console program to the Controller PC.
8. Configure the controller PC’s IP address to the same TXs subnet. If the TXs are set with the Factory default IP setting (static IP), then set the PC IP to 10.0.1.1 with Net Mask 255.0.0.0. If you have changed the TX IP to Auto IP, then you should set the PC’s IP to 169.254.1.1/255.255.0.0.
9. Run the AV-952x KVMoIP Virtual Console, and it will pop up a TX IP dialog box to enter the target TX IP address.

10. Enter the TX IP address that you want to take control. Within a couple seconds the TX screenshot will be displayed on the Controller PC like below:

11. You can enter more TX IP address on the TX IP dialog box for multiple TXs.
12. The current TX IP is shown on the left-top corner, and there are 2 function buttons for KVMoIP Virtual Console:
A. Send Ctrl-Alt-Del: Click this button to sendB. Mouse Mode: Select Absolute or Relative Mode.
The Absolute mode is recommended when PC Windows OS is running.
The Relative mode is recommended when PC is in BIOS stage.


